In the era of AI-powered systems like ChatGPT and Claude, connecting large language models (LLMs) with real-world data has become essential. The Model Context Protocol (MCP) provides an open standard that enables AI models to communicate with external systems through structured actions.
In this tutorial, we’ll build an MCP client using Node.js — step by step. You’ll learn how to:
- Fetch the schema from an MCP server.
- Send action requests with structured data.
- Handle authentication and errors properly.
- Integrate your MCP client into real-world AI applications.
Let’s dive in!
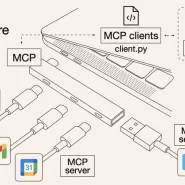
What Is the Model Context Protocol (MCP)?
The Model Context Protocol (MCP) is an open standard that defines how AI models and external systems communicate in a structured, secure way.
It has two key parts:
- MCP Server: Provides access to tools, APIs, or databases.
- MCP Client: The component that sends structured requests (actions) to the server.
You can think of MCP as a bridge — allowing AI models to fetch real-time data, trigger operations, or integrate with enterprise systems in a consistent, standardized way.
Official documentation: modelcontextprotocol.io
Step 1 – Set Up Your Node.js Project
First, create a new Node.js project and install the required dependencies.
mkdir mcp-client-node
cd mcp-client-node
npm init -y
npm install node-fetch dotenvThen, create a .env file with your MCP server endpoint and API key:
MCP_SERVER_URL=http://localhost:4000/mcp
API_KEY=your-api-key-here💡 Tip: Always use .env to store sensitive data securely.
Step 2 – Create the Client File
Create a new file named client.js. This file will handle communication with your MCP server.
import fetch from "node-fetch";
import dotenv from "dotenv";

dotenv.config();

const MCP_SERVER = process.env.MCP_SERVER_URL;
const API_KEY = process.env.API_KEY;

async function callMcp(action, data) {
  const resp = await fetch(`${MCP_SERVER}/action`, {
    method: "POST",
    headers: {
      "Content-Type": "application/json",
      "x-api-key": API_KEY
    },
    body: JSON.stringify({ action, data })
  });

  const json = await resp.json();
  if (json.status !== "success") {
    throw new Error(`MCP error: ${json.message || "unknown error"}`);
  }
  return json.result;
}

// Example usage
(async () => {
  try {
    const user = await callMcp("getUserInfo", { userId: "123" });
    console.log("User Info:", user);
  } catch (err) {
    console.error("Error calling MCP:", err);
  }
})();
What this does:
- Sends an action request to the MCP server.
- Authenticates with your API key.
- Handles success/error responses gracefully.
Step 3 – Retrieve the MCP Schema
Before sending actions, your client should understand what actions are available on the server. MCP servers expose a /schema endpoint that describes available actions and their parameters.
Add this function to your client.js:
async function getSchema() {
  const resp = await fetch(`${MCP_SERVER}/schema`, {
    method: "GET",
    headers: { "x-api-key": API_KEY }
  });
  if (!resp.ok) throw new Error("Failed to fetch schema");
  const schema = await resp.json();
  return schema;
}

// Example usage:
(async () => {
  const schema = await getSchema();
  console.log("Available MCP Actions:", schema.actions);
})();
Why this matters:
Fetching the schema allows your client to dynamically adapt when the server adds or modifies actions — no manual updates required.
Step 4 – Handle Authentication
MCP servers often require authentication for security. You can:
- Pass an API key via x-api-key header (simplest).
- Use OAuth2, JWT, or signed tokens for enterprise setups.
Example middleware-style helper:
function getHeaders() {
  return {
    "Content-Type": "application/json",
    "x-api-key": API_KEY
  };
}Then reuse getHeaders() in all requests — consistent and secure.
Step 5 – Integrate the MCP Client with AI Models
Once your client works, it can be integrated into AI applications.
For example, in a ChatGPT App or LangChain agent:
- The AI generates an “action intent” (e.g., getUserInfo)
- Your Node.js client receives that request
- The client sends it to the MCP server, retrieves real data, and sends it back to the model
This enables your AI system to interact with real-world APIs, databases, and tools in real time.
🧠 Think of MCP as the missing “action layer” that makes LLMs truly useful in business environments.
Step 6 – Error Handling & Logging
Add robust error handling to your MCP client.
async function safeCall(action, data) {
  try {
    const result = await callMcp(action, data);
    console.log(`✅ ${action} success:`, result);
  } catch (error) {
    console.error(`❌ ${action} failed:`, error.message);
  }
}You can also log activity using tools like Winston or Pino for production monitoring.
Step 7 – Organize Your Files
Here’s a clean project structure:
mcp-client-node/
├── client.js
├── .env
├── package.json
└── README.mdOptional extensions:
- lib/mcpClient.js — reusable MCP client class
- utils/logger.js — central logging
- examples/ — sample integrations
Step 8 – Common MCP Client Patterns
| Pattern | Description | Example |
| Action Invocation | Execute a defined action with parameters | callMcp(“getWeather”, { city: “Paris” }) |
| Schema Fetching | Load available actions | getSchema() |
| Context Awareness | Send user/session context | { action: “getTasks”, data: { userId, date } } |
| Chained Actions | Run one action’s output as another’s input | getUserInfo → getTasks(user.email) |
These patterns allow AI-driven systems to handle dynamic workflows.
Step 9 – Best Practices
- Security: Never hardcode credentials — always use environment variables.
- Resilience: Implement retries or exponential backoff for failed requests.
- Logging: Keep track of every request for observability.
- Schema Validation: Validate server responses to prevent inconsistent data.
- Scalability: Use async queues (like BullMQ) if you expect high request volumes.
Conclusion
Building an MCP client with Node.js empowers developers to connect AI models directly with APIs, databases, and tools — securely and efficiently.
By using the Model Context Protocol, your AI applications can move beyond passive text generation into actionable, context-aware automation.
🌟 In short, MCP clients are the “hands and eyes” of your AI models — giving them the power to see data and act in the real world.