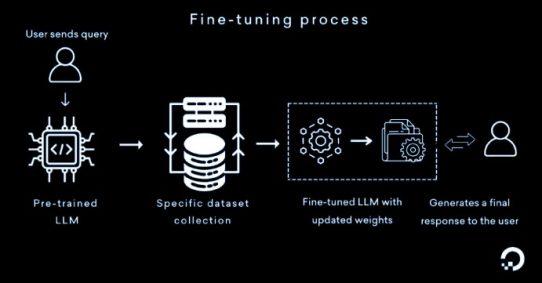
Laravel MCP (Model Context Protocol) is a brand-new package introduced in Laravel 12 that allows developers to create AI-interoperable servers.
With MCP, your Laravel app can expose “tools” and “resources” that AI clients — such as ChatGPT, Claude, or custom agents — can directly interact with.
In short, Laravel MCP lets your Laravel app “talk to” AI agents safely and predictably.
In this tutorial, you’ll learn how to set up a basic MCP server using Laravel 12, define tools, and expose endpoints that can be used by AI clients.
What You’ll Need
Before you begin, make sure you have the following:
- PHP 8.1+
- Laravel 12 installed
- Composer
- Basic understanding of Laravel routes and Artisan commands
Step 1: Install Laravel MCP
Run the following Composer command:
composer require laravel/mcpThis installs the official Laravel MCP package and registers it in your app.
Step 2: Create a Server Class
MCP servers define the AI-accessible logic for your app.
Run the Artisan command:
php artisan make:mcp-server WeatherServerThis will create a new file under app/Mcp/Servers/WeatherServer.php.
Edit it as follows:
namespace App\Mcp\Servers;

use Laravel\Mcp\Server;

class WeatherServer extends Server
{
    public string $name = 'Weather Server';
    public string $version = '1.0.0';
    public string $instructions = 'Provides current weather data for a given city.';

    public array $tools = [
        \App\Mcp\Tools\CurrentWeatherTool::class,
    ];
}Step 3: Define a Tool
Tools represent the actions that AI clients can call.
Create one using Artisan:
php artisan make:mcp-tool CurrentWeatherToolThis will generate a new file at app/Mcp/Tools/CurrentWeatherTool.php.
Edit it as follows:
namespace App\Mcp\Tools;

use Laravel\Mcp\Tool;
use Laravel\Mcp\Http\Request;
use Laravel\Mcp\Http\Response;
use Laravel\Mcp\Support\JsonSchema;

class CurrentWeatherTool extends Tool
{
    protected string $description = 'Fetches the current weather for a given location.';

    public function handle(Request $request): Response
    {
        $location = $request->get('location');

        // For demo purposes, we return static data
        $weather = "Sunny, 27°C";

        return Response::text("The weather in {$location} is {$weather}.");
    }

    public function schema(JsonSchema $schema): array
    {
        return [
            'location' => $schema->string()->description('The location to fetch weather for.')
        ];
    }
}Step 4: Register the MCP Server
Now you need to register your MCP server so it can be accessed via HTTP or locally.
Open routes/web.php and add:
use Laravel\Mcp\Facades\Mcp;
use App\Mcp\Servers\WeatherServer;

Mcp::web('/mcp/weather', WeatherServer::class);This creates an MCP endpoint accessible at: https://your-app.test/mcp/weather
Alternatively, for local development or CLI usage, you can register a local server:
Mcp::local('weather', WeatherServer::class);Step 5: Test Your MCP Endpoint
Once your app is running (php artisan serve), open your terminal or connect a compatible AI client (like ChatGPT or Claude) using MCP configuration.
If everything is correct, your AI agent can now call:
{
  "action": "CurrentWeatherTool",
  "parameters": {
    "location": "New York"
  }
}
And receive a response:
"The weather in New York is Sunny, 27°C."Step 6: Add Resources or Prompts (Optional)
Laravel MCP also supports Resources (shared data sources) and Prompts (reusable prompt templates).
You can define these in your Server class, just like tools:
public array $resources = [
    \App\Mcp\Resources\UserProfileResource::class,
];

public array $prompts = [
    \App\Mcp\Prompts\SummarizePrompt::class,
];
These components help structure more complex interactions between your Laravel app and AI systems.
Step 7: Secure Your MCP Endpoints
AI clients are just like any external system — you must secure access.
Use Laravel’s built-in middleware:
Route::middleware(['auth:sanctum', 'throttle:mcp'])->group(function () {
    Mcp::web('/mcp/secure-weather', WeatherServer::class);
});You can also integrate Laravel Passport or custom API keys for advanced security.
Step 8: Debug and Log AI Interactions
MCP integrates cleanly with Laravel’s logging system, so all requests and responses can be logged using:
\Log::info('MCP Request', $request->all());
\Log::info('MCP Response', $response->toArray());This makes it easy to monitor agent usage and debug behaviors.
Conclusion
With Laravel MCP, you can transform your Laravel app into a fully AI-aware system, allowing intelligent agents to call your APIs, access structured data, and automate workflows.
You’ve just built your first MCP server that exposes a simple weather tool — but the same principles can scale to any complex business logic.
Laravel is not just for web apps anymore — it’s now part of the AI infrastructure ecosystem.